


Frequently Asked Questions
Find answers to commonly asked questions below.

Most people only start thinking about solar panel protection from birds once something has gone wrong. A cooing noise on the roof at dawn. Droppings streaked down the tiles. Twigs poking out from under the bottom row of panels. So you (or an installer) put something up, and a few months later the birds are back.
That's rarely bad luck. When bird proofing under solar panels fails, it tends to fail in a handful of predictable ways, and nearly all of them are avoidable. Here's what goes wrong, why it matters, and what to do instead.
Birds don't need much. The gap between a solar array and the roof is warm, dry and out of the wind, which makes it a better nesting spot than most trees. And pigeons are persistent. Councils that deal with feral pigeons point out that nests need to be removed regularly over the long term to discourage birds from nesting in the same spot.
That's why the fix has to be physical. The best option is to physically exclude birds from nesting under the array. Noise machines, mirrors and plastic owls tend not to hold up, decoys can lose their effect as birds get used to them, and results from ultrasonic repellers vary.
So the job isn't scaring birds off. It's leaving them nowhere to land and nowhere to nest. Any weak point in the barrier is where they'll go.
These are the ones worth checking for before you spend a cent.
The straight runs along an array are easy. The trouble starts at corners, around the mounts, and wherever one length of mesh meets the next. A bird doesn't need a big opening, so a loose join or a corner that's been bent over without patching can undo the rest of the job.

There's a reason the fitting method treats outside corners, inside corners, mounts and overlapping joins as separate steps. Each one has its own method, from cutting and bending the mesh at a corner to covering any leftover gap with off-cut mesh and cable ties.
Fitting mesh over an active nest is the quickest way to make things worse. Old nesting material left behind also gives the next bird a head start. Check for activity first. If there are eggs or chicks, or you're not sure which species you're dealing with, stop and ask your state wildlife authority or a licensed pest controller, because some birds are protected and their nests can be too.
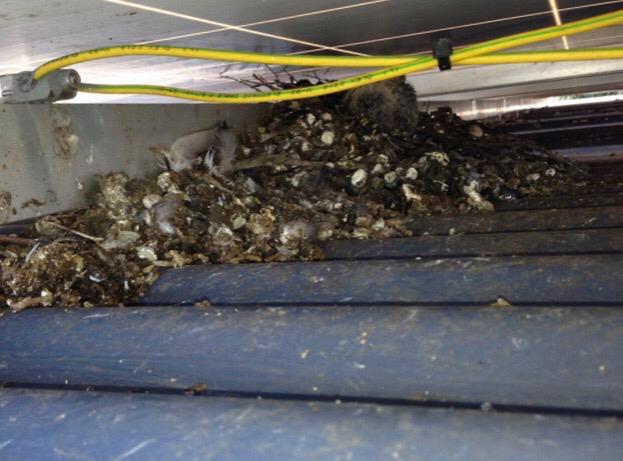
Once the space is empty, clear out the old material and droppings before any mesh goes on. Wear gloves, goggles and a mask. Council guidance on feral pigeons recommends protective gear when handling droppings.
And leave the pressure washer in the shed. Water can get into panel edges or connectors and cause earth faults, so a plastic scraper and a bucket of water is the safer approach.
A roll of mesh that's cheap per metre gets expensive quickly if it rusts, sags or turns brittle after a couple of summers. Australian roofs cop hard sun, wind-driven rain and, near the coast, salt air. What the mesh is made of, what coats it, how big the openings are and what holds it on all matter.
For reference, our solar mesh uses a 0.7mm Q195 carbon steel core that's electro-galvanised and PVC coated, with a finished thickness of 1.0mm and half inch (about 12.7mm) openings. There's also a stainless steel 304 option. Whatever you buy, ask for those details. If a listing can't tell you the material, the coating and the opening size, move on.
Mesh that's tied on loosely, or held by fixings that work loose in the heat and wind, ends up sagging and peeling away from the panel edge. Birds find that sort of gap fast.
Drilling is the other trap. Some panels have no bottom flange to fix to, so drilling can end up being an option, and you should check the panel warranty before you do it. Read your panel manufacturer's terms before putting a screw through a frame.
Our clips work differently. They go through the mesh and secure against the inside lip of the panel, with a washer pulling the mesh tight to the side of the panel. If your frame doesn't have a lip to clip to, talk to the panel manufacturer or your solar installer before improvising.
Spikes, reflective tape, plastic owls and sonic devices are cheap and easy, which is why they're popular. They discourage perching. They don't close the gap under the panels, so the nesting spot stays open to any bird that isn't bothered by them.
There's a place for spikes on a ledge or a rail. Under an array, a physical barrier does the real work.
Birds that can't get under the panels often try the next sheltered spot, and the gutters are right there. Pigeons, sparrows and starlings all nest in gutters and roof cavities, and their nesting material is a common reason gutters block. Blocked gutters then hold standing water, which mosquitoes can breed in.
If you're proofing the panels, look at the roofline at the same time. Birds that can't nest under the panels often try the gutters next, where nesting material is a common cause of blocked gutters, and a bird proof gutter guard closes that gap too.
Falls from height are the major cause of death and injury in roof work, according to Safe Work Australia. Its guidance is to treat every roof as fragile until a competent person confirms otherwise, and wind, rain and heat all add to the risk. Reaching along an array edge from a ladder, or stepping out onto tiles to get to the far corner, is a very different job from a quick fix at the eaves.
If your roof is steep, tiled, double storey or hard to reach safely, hire someone. That isn't a failure of DIY nerve, it's the right call. Either way, leave the array wiring alone. Array wiring can carry high DC voltage in sunlight, so keep metal tools well away from it.
Pigeons are usually the first problem, but they're rarely the last. Rats and possums chew wiring, damaged cables can lead to faults at the inverter, and insulation is no match for sharp teeth. A sheltered nesting site under panels is exactly what attracts them, so taking away the shelter removes part of the reason they come.
Possums need a different approach. They're a protected native species. In NSW, for example, it's illegal to relocate or kill a possum, or to trap and release one, without a licence, and the state's advice is to seal entry points only once you're sure the possum has left the roof to forage. Other states publish their own guidance too, including Victoria and South Australia. The rule of thumb everywhere is the same: exclusion, never removal, and never seal an animal in.
Then there's the climate. Heat and UV are hard on cheap plastics, and salt air is hard on unprotected metal, so the material you choose decides how long the barrier stays intact.
One honest caveat. Half inch openings are built to stop birds. Smaller pests such as mites and very small rodents are a different story, so think of mesh under your panels as a strong barrier against birds and a way to remove a sheltered nesting spot, not a guarantee that nothing will ever get onto your roof.

Call in a licensed pest controller or an experienced solar installer if the roof is steep or tiled, the array is large, there's an established nest, or anything electrical is involved. If a solar installer won't fit mesh, a gutter guard installer may be able to, with any electrical work still handled by a qualified person.
Once you've steered clear of these, the rest is straightforward. Plan the runs, fit the mesh in order, and check the cost against your array before you buy. If the roof is steep or you'd rather not climb a ladder, weigh up doing it yourself against hiring a professional first.
Mesh: Your corrugated roof Colorbond gutter guard kit comes with our durable Aluminium Gutter Guard Mesh. All kits are delivered in a gutter guard ...
View full detailsMesh: Your valley gutter guard kit for corrugated valleys comes with our durable aluminium mesh. It is delivered in roll form for easier installati...
View full detailsMesh: Your gutter guard for tiled roofs comes with our durable Aluminium Leaf Guard Mesh. It is delivered as a leaf guard mesh roll for easier inst...
View full detailsMesh: Your tiled roof valley guard kit for tiled roofs comes with our durable Aluminium Leaf Guard Mesh. Valley guard for tiled roofs is delivered ...
View full detailsMesh: Your Trimdek gutter guard kit comes with our durable Aluminium Gutter Mesh. All kits are delivered in a DIY gutter guard mesh roll for easier...
View full detailsFind answers to commonly asked questions below.